Login
The login URL for Ambra is ambra.rdcrn.org. The Tool Garden accessible from the members landing page now contains Ambra. Once Ambra is setup for a protocol, it will also appear on the Protocol Resources page for that consortia.
2-Factor Authentication
Because Ambra can contain PHI, login requires the use of the RDCRN 2-Factor Authentication setup. If you have already set this up for other RDCRN applications such as Box or Redcap, nothing else should need done. To setup the 2-factor authentication, follow our instructions here.
Uploading Images
The basic steps to uploading images are: selecting the location to store the uploaded image(s), selecting the folder containing the image(s) to upload, inputting metadata for the images such as participant IDs or visit name, and then uploading the images. These steps are described below.
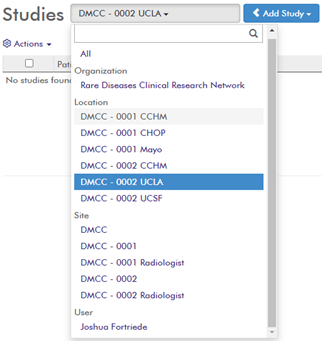
Choose the location where the uploaded images will be uploaded, click “Add Study”, and then select “Upload Studies”.
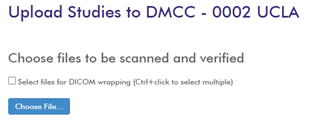
Click “Choose File…” to select the folder that contains the imaging files to upload. You will then receive a prompt stating how many files will be uploaded, and it will ask you to “Upload” or “Cancel”. Click “Upload” to continue. There may or may not be a checkbox to “Select files for DICOM wrapping”. Use this feature only if you are uploading photos (jpgs, pngs, etc) and not if you are using normal DICOM files.
After scanning the files, a table will appear that summarizes the image files. Each row represents an individual series in an Imaging Study, and provides general information about that series; including the series description, number of images, modality type, study date, and patient’s name and DOB. Series can be unchecked to remove them from the upload process.
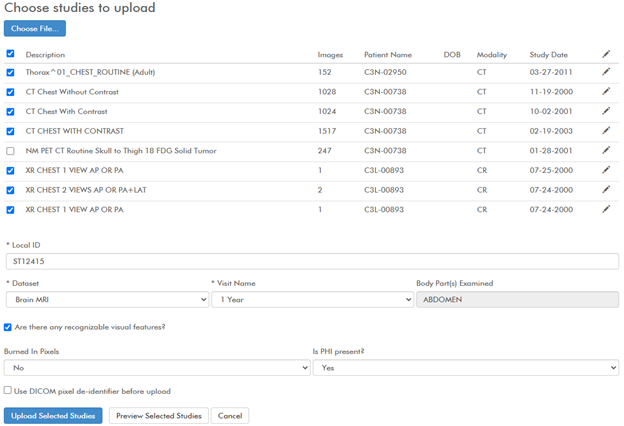
Below the table are a series of fields that need to be filled out. These fields will vary depending on the protocol, including if they are already pre-filled or not. Required fields will have an asterisk “*” preceding the field label. The values in these fields are associated with each study/series that is uploaded. To selectively change a field value for an individual series, click the edit button 🖋 next to the series.
If the images contain pixels that need to be removed (such as Dose Reports, or embedded PDFs), this can be done prior to upload or once the images are within Ambra. To mask pixels prior to upload click the “Use DICOM pixel de-identifier before upload” button.
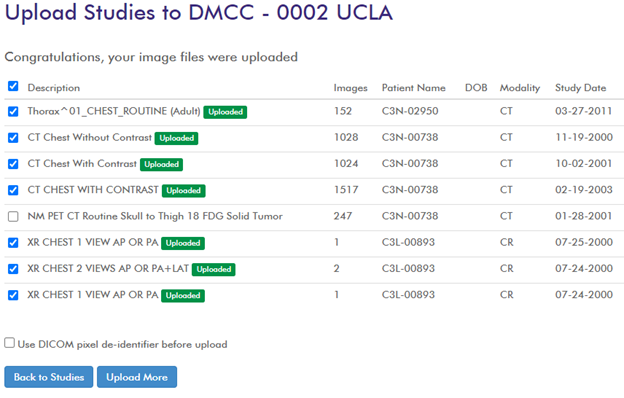
Once all fields are filled out, click “Upload Selected Studies”. Upload progress is displayed, and you will see a notification of when all images have been uploaded.
Approve Images
Protocols are setup so that images uploaded to the clinical sites require approval within Ambra to be fully stored and shared outside of the clinical site space. This approval also finishes the DICOM tag based de-identification process.
After images are uploaded, they will go into an approval queue. This queue can be accessed by clicking on the “Activities” link in the top toolbar.

Study/Image metadata can be viewed and edited by clicking on the “Edit” button.
Images can be viewed by clicking on the “Images” button. To redact pixels from the image, see Pixel-Based Redaction.
Within the activities view, you can view images, edit the metadata associated with the imaging studies, and approve or reject the images.
Image De-identification
There are two types of image de-identification: DICOM tag based, and Pixel based. DICOM tag de-identification is setup to occur automatically, while pixel-based de-identification is a manual process.
DICOM tag Removal/Anonymization
PHI containing DICOM tags are removed on upload/after approval. These tags were identified by the DICOM standards committee of the National Electrical Manufacturers Association (NEMA), in their DICOM attribute confidentiality profiles section. A complete list of our implementation of these standards and the affected DICOM tags is forthcoming. In addition, all “Private Tags” are removed as these can also contain PHI.
Pixel-Based Redaction
Within the Ambra ProViewer, image pixels can be redacted on the image, series, or study level. To redact pixels, click on the Redact item in the toolbar and then choose whether you want to redact pixels from the current image, the current series, or the entire study. If you do not see the “Redact” icon in the toolbar, please see “Configuring Ambra ProViewer”.
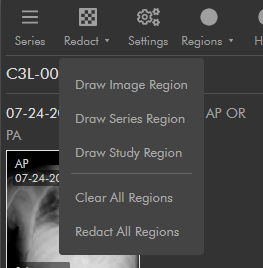
Once selected, draw the region of which you would like to redact. Multiple regions can be drawn.
After all regions are drawn, click the “Redact” toolbar item and then click “Redact All Regions”. A prompt will ask you to confirm the redaction.
Configuring Ambra ProViewer
The Ambra ProViewer can be configured by clicking the “Settings” icon in the toolbar.
Enable Image Pixel Redaction
To ensure that pixels can be redacted from the current image, series, or study, follow these steps.
If the “Redact” icon is not present in the toolbar, click on the “Settings” Icon, then select “Toolbar” from the left-sided menu.
Under “Available Tools”, scroll down to the “Quality Control” section, locate the “Redact” icon, and drag it into the “Toolbar” column in the position you want it to appear.
Click back to the “General” tab and scroll down to the “Editing” section.
Make sure the “Edit Current Study (No Copy)” checkbox is checked.
Click “Save All” in the bottom left of the screen.
Customizing Ambra per User
Ambra accounts can be customized in various ways to enhance a user’s experience. These customizations include event notifications, default pages, and myriad settings within the ProViewer.
Setting up Event Notifications
Notifications can be turned on to email users when certain events occur. These events include, but are not limited to, image upload, image share, image status change, and image upload failures.
Click on your name in the upper right corner of any page.
Next, click on the “Notifications” link.

Select the notification type (columns) that you want to turn on/off for the given Ambra workspace (rows).
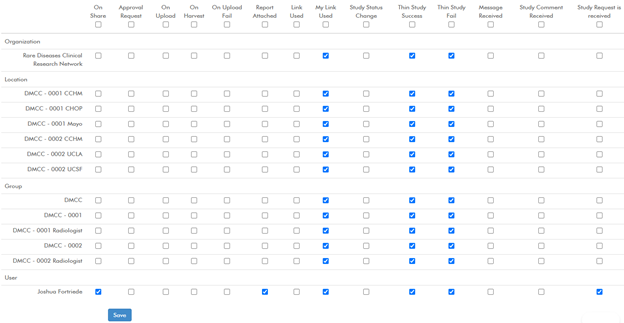
After selecting/deselected the desired notifications, click the “Save” button in the bottom left of the page.
Configure ProViewer
ProViewer configuration and usage instructions can be found in the Ambra ProViewer Guide.
Support
The support page can be accessed by clicking the “Help” link in the upper portion of the page.

Submitting tickets to the RDCRN Helpdesk
To submit a ticket to the RDCRN Helpdesk system, click on the “RDCRN Helpdesk” link.